Sunday 24 September 2017

Geo Locations API: Javascript

Below is the basic code to demonstrate plotting location on google maps:

<style>
#map {
height: 500px;
width: 100%;
}
</style>

<!--API Reference start-->
<!--Note that this is Geolocation API Reference without key-->
<script type="text/javascript" src="http://maps.google.com/maps/api/js?sensor=false"></script>
<!--API Reference end-->

<!--Interface start-->
<button onclick="getLocation()">Get My Location on Google Maps</button>
<div id="map">This is where the map will be displayed.</div>
<!--Interface end-->

<script>
var lat, lng;
function getLocation() {
if (navigator.geolocation) {
navigator.geolocation.getCurrentPosition(showPosition, fail, options);
} else {
x.innerHTML = "Geolocation is not supported by this browser.";
}
}
function showPosition(position) {
lat = position.coords.latitude;
lng = position.coords.longitude;
var mylocation = {lat: lat, lng: lng};
var map = new google.maps.Map(document.getElementById("map"), {
zoom: 12,
center: mylocation
});
var marker = new google.maps.Marker({
position: mylocation,
map: map
});
}
function fail(error) {
var errorType = {
0:"Unknown Error",
1:"Permission denied by the user",
2:"Position of the user not available",
3:"Request timed out"
};
var errMsg = errorType[error.code];
if(error.code == 0 || error.code == 2) {
errMsg = errMsg + " - " + error.message;
}
alert(errMsg);
}
var options = {
enableHighAccuracy: true,
timeout: Infinity,
maximumAge: 0
};

</script>
Monday 27 March 2017

Tally ERP 9's Web Service Architecture (Introduction to PHP to Tally Integration)


This post introduces basic PHP to integrate with Tally.ERP 9.
Before you go further with the introduction, my assumption is that you already know basics of Tally along with Tally's XML schema and if not then watch the following video for the basic idea of Tally's XML:

Alternate link

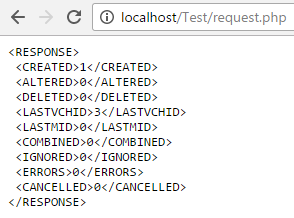
The following is a working PHP code which sends a payment voucher to Tally database through SOAP request into the Web Service Architecture of Tally and fetches a response from Tally indicating the action taken by Tally for the request in XML format.
Check it out.


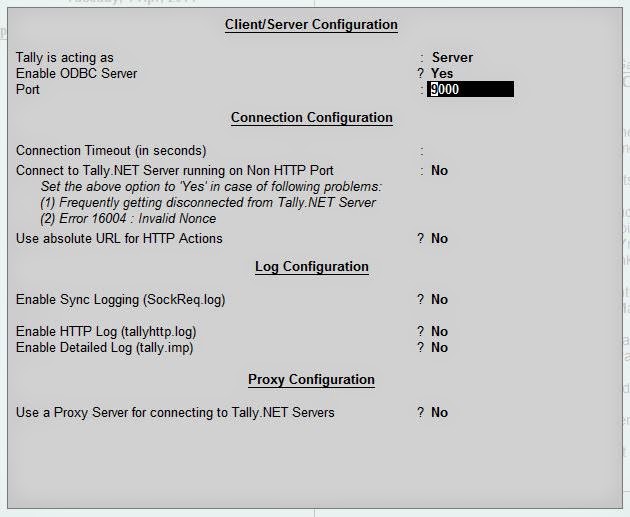
1: Go to "Gateway of Tally >> F12 Configure >> Advanced Configuration" settings (Some initial settings needed to be done inside Tally)


2: Request by the PHP application code

$xml_str = ""
. "<ENVELOPE>"
. "<HEADER><TALLYREQUEST>Import Data</TALLYREQUEST></HEADER>"
. "<BODY>"
. "<IMPORTDATA>"
. "<REQUESTDESC><REPORTNAME>Vouchers</REPORTNAME><STATICVARIABLES><SVCURRENTCOMPANY>APB</SVCURRENTCOMPANY></STATICVARIABLES></REQUESTDESC>"
. "<REQUESTDATA>"
. "<TALLYMESSAGE xmlns:UDF=\"TallyUDF\">"
. "<VOUCHER REMOTEID=\"00000001\" VCHTYPE=\"Receipt\" ACTION=\"Create\" OBJVIEW=\"Accounting Voucher View\">"    
. "<DATE>20160401</DATE>"
. "<VOUCHERTYPENAME>Receipt</VOUCHERTYPENAME>"
. "<VOUCHERNUMBER>1</VOUCHERNUMBER>"
. "<PARTYLEDGERNAME>Cash</PARTYLEDGERNAME>"
. "<PERSISTEDVIEW>Accounting Voucher View</PERSISTEDVIEW>"
. "<ALLLEDGERENTRIES.LIST>"
. "<LEDGERNAME>Capital Account</LEDGERNAME>"
. "<ISDEEMEDPOSITIVE>No</ISDEEMEDPOSITIVE>"
. "<AMOUNT>50000.00</AMOUNT>"
. "</ALLLEDGERENTRIES.LIST>"
. "<ALLLEDGERENTRIES.LIST>"    
. "<LEDGERNAME>Cash</LEDGERNAME>"
. "<ISDEEMEDPOSITIVE>Yes</ISDEEMEDPOSITIVE>"
. "<AMOUNT>-50000.00</AMOUNT>"        
. "</ALLLEDGERENTRIES.LIST>"  
. "</VOUCHER>"
. "</TALLYMESSAGE>"
. "</REQUESTDATA>"
. "</IMPORTDATA>"
. "</BODY>"
                . "</ENVELOPE>";
$url = "http://localhost:9000";
$headers = array("Content-type: text/xml", "Content-length:" . strlen($xml_str), "Connection: close");

$ch = curl_init();
curl_setopt($ch, CURLOPT_URL, $url);
curl_setopt($ch, CURLOPT_RETURNTRANSFER, 1);
curl_setopt($ch, CURLOPT_TIMEOUT, 100);
curl_setopt($ch, CURLOPT_POST, true);
curl_setopt($ch, CURLOPT_POSTFIELDS, $xml_str);
curl_setopt($ch, CURLOPT_HTTPHEADER, $headers);
$data = curl_exec($ch);

if(curl_errno($ch)) {
print curl_error($ch);
} else {
print "<pre>" . htmlentities($data) . "</pre>";
curl_close($ch);
}


3: Response by the Tally Web Service Architecture


4: Voucher inserted inside Tally

Sunday 25 September 2016

TWITTER JAVA API: JAVA POST TO TWITTER (USING TWITTER4J API)


Dear All,

The following content is intended to demonstrate TWITTER INTEGRATION in a simplified way:

Step 1
Go to https://apps.twitter.com/

Step 2
Create New App.

Step 3
After creating new app, you shall receive following:
1. Consumer Key (API Key)
2. Consumer Secret (API Secret)
3. Access Token
4. Access Token Secret

Step 4
Download Twitter4j API kit from the below link:
http://twitter4j.org/archive/twitter4j-4.0.4.zip
Attach it to your library folder. See below.


Step 5
Compile the below core java code.

package twitterintegrator;

import java.util.logging.Level;
import java.util.logging.Logger;
import twitter4j.Twitter;
import twitter4j.TwitterException;
import twitter4j.TwitterFactory;
import twitter4j.auth.AccessToken;

/**
 *
 * @author Suneet
 */
public class TwitterIntegrator {

    /**
     * @param args the command line arguments
     */
    
    //CREATE TWITTER OBJECT USING API TOKENS
    synchronized static Twitter getTwitter() {
        Twitter twitter = TwitterFactory.getSingleton();
        
        //Keep the "Consumer Secret" a secret. 
        //This key should never be human-readable in your application.
        twitter.setOAuthConsumer("Consumer Key (API Key)", "Consumer Secret (API Secret)");
        //This access token can be used to make API requests on your own account's behalf. 
        //Do not share your access token secret with anyone.
        AccessToken at = new AccessToken("Access Token", "Access Token Secret");
        twitter.setOAuthAccessToken(at);
        //Authorized Twitter object created.
        return twitter;
    }
    
    public static void main(String[] args) {
        try {
            // TODO code application logic here
            //Create Twitter object.
            Twitter twitter = getTwitter();
            //Set status message by calling 'updateStatus()' method.
            twitter.updateStatus("Hello World! - Posted from my app.");
            //You are encouraged to explore more functions of the Twitter object.
            System.out.println("Message posted.");
        } catch (TwitterException ex) {
            Logger.getLogger(TwitterIntegrator.class.getName()).log(Level.SEVERE, null, ex);
        }
    }
}

Step 6
Check Status on https://twitter.com/

Sunday 24 April 2016

INTUIT JAVA API: AUTHORIZATION (JAVA TO QUICKBOOKS ONLINE INTEGRATION)

Dear All,

The following content is intended to demonstrate INTUIT API AUTHORIZATION in a simplified way:


Note: This tutorial assumes that you have already registered in https://developer.intuit.com
and created and and registered new app. So you must be having 'Oauth Consumer Key' & 'Oauth Consumer Secret'.

Outlined Steps: 

  • Get REQUEST TOKEN, REQUEST TOKEN SECRET & Authorization URL.
  • Go to Authorization URL select the company to be authorised and click Authorize button.
  • Get OAUTH VERIFIER CODE post authorization (after autorization button is clicked) through a GET request from Intuit API server.
  • Get ACCESS TOKEN and ACCESS TOKEN SECRET using
    OAUTH VERIFIER CODE,
    REQUEST TOKEN & REQUEST TOKEN SECRET.
  • Create DateService object using 'Oauth Consumer Key', 'Oauth Consumer Secret', ACCESS TOKEN, ACCESS TOKEN SECRET & Company id (a.k.a Realm id).

CLICK HERE FOR BASIC SAMPLE CODES

Sunday 20 September 2015

SKYNETQBO APP - EXCEL TO QUICKBOOKS ONLINE (QBO)


Disclaimer: Intuit Inc. does not assume responsibility for SKYNETQBO APP.


VERSION 7.5
Note: Issue of contact name has been resolved.
Click here to download
Click here to download import xls format
VERSION 7.0
Note: Issue of apostrophe (') resolved for Customer Name, Item Name, Class, Location & Deposit Bank fields.
Click here to download
Click here to download import xls format
VERSION 6.0 K
Click here to download
Click here to download import xls format
VERSION 5.5
Click here to download
Click here to download import xls format
VERSION 5.0
Click here to download
Click here to download import xls format
VERSION 3.5
Click here to download
Click here to download import xls format
VERSION 3.0
Click here to download
Click here to download import xls format
VERSION 2.5
Click here to download
Click here to download import xls format


SHORT INTRODUCTION:


APPLICATION NAME: 
SKYNETQBO APP

FUNCTIONALITY: 

TRANSACTION IMPORT FROM .XLS FILE (SPECIFIED FORMAT) TO QUICKBOOKS ONLINE

TECHNOLOGY: 

CORE JAVA 

DATABASE TECHNOLOGY: 

<NOT APPLICABLE>

DEVELOPER: 

SUNEET K. CHAUDHARY

Dear Folks,

The above desktop app is an integration application for importing transactions from excel to Quickbooks Online.


So far the following transactions can be imported:

1. Invoice: Multi lines with multiple accounts and multiple stock items.


Click here,
IMPLEMENTATION MANUAL 


Please Note:
As far as possible, the following special characters must be avoided in the .xls file for import:


  • <
  • >
  • &
  • '
  • "
Note: Issue of apostrophe (') resolved for Customer Name, Item Name, Class, Location & Deposit Bank fields.